- Programs
- For Providers & Educators
- For Communities
- For Parents & Families
- Advocacy & Policy
- Research
- Make an Impact
- About IAFC
How to Edit Your Site
How To | Style Guide | Content Styles | Accessibility Tips | Page Blocks
Table of Contents
Creating, Editing, & Cloning Pages
To create a new page, go to: Pages > Add New
To edit an existing page, go to: Pages > find the page you’d like to edit > Edit
NOTE: When creating a new page you’ll see a Hero Page Block and a Footer CTA Page Block already in place.
How to Set Up a Page’s Basic Information
Page Title
Enter a title in the field that says “Add Title.” This will be the administration title for your page. It will also be used as the H1 for your hero page block unless the content is overwritten in the hero page block.
URL / Permalink & Parent Page
Clicking the settings panel icon in the upper-right corner will open the settings panel. From here, you can update the URL under “Summary” and the Parent Page under “Page Attributes.”
If you assign a page to a parent page it will change the URL structure of the page.
EXAMPLE: If “Our Values” is assigned to “Home” its URL will change from looking like this: www.(your site).com/our-values/ To looking like this: www.(your site).com/about/our-values/
NOTE: If your parent page is included in any menu you now want to navigate to Appearance > Menus. See menus below for further instructions.
Hero Page Block
The hero page block will typically always be the first block you add to a page. This is the area the user sees first, and should inform and convey the purpose of your page.
- Settings Tab — You should see options to add a background image to your hero area as well as any other custom fields required for the design of your site’s hero page blocks.
- Content Tab — Here you should see the following fields:
- Title, which is the H1 for your page. If nothing is specified here, WordPress will use the page title.
- WYSIWYG, which is where the intro text for your hero page block
NOTE: Depending on how your site’s page template has been set up, the page might automatically have a hero page block added when you create a new page.
Call-to-Action (CTA) Page Block
When you create a new page from scratch, you should see a global page Call-to-Action Page Block at the bottom. You can keep this block in place or remove it and replace it with a custom Call-to-Action Page Block if you’d like.
NOTE: Often Call-to-Action page blocks are created with reusable blocks. For more information about reusable blocks, check out the reusable block section below.
Yoast SEO / Page Metadata
WATCH: How to Write and Add Title Tags & Meta Descriptions to Pages and Posts in WordPress
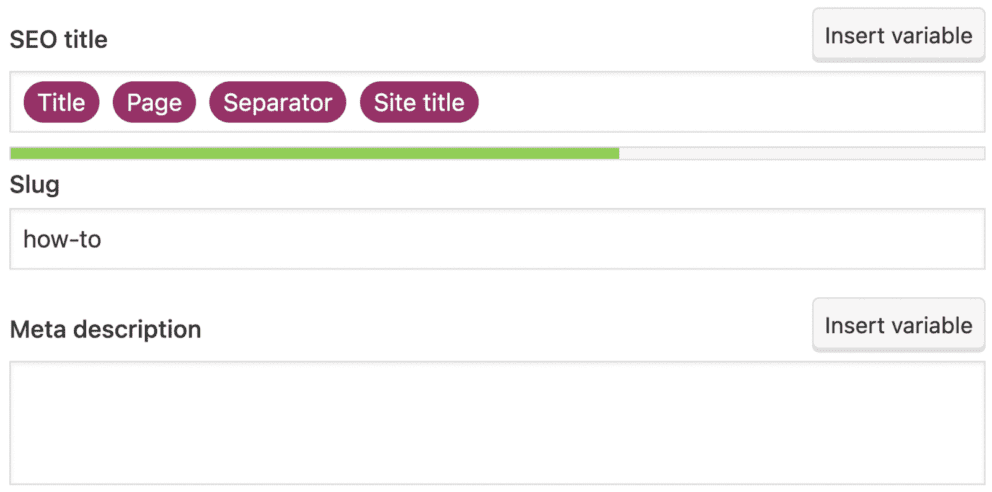
Scroll to the bottom of the page to the “Yoast SEO” section. Here you should see options to edit the SEO title and meta description.
- The SEO title tag must contain your target keyword. This tells both search engines and searchers that your web page is relevant to this search query. Searchers are much more likely to click on a web page if they see the exact keyword or keyword phrase they just typed in the title.
NOTE: For consistency, we recommend leaving in the “Separator” and “Site Title” variables in the SEO title field.
- The meta description is an attribute within your meta tags that helps describe your page. This snippet of text will appear in the search engine results under your headline. If you leave the meta description area blank within the Yoast SEO section, some existing copy from the page will show up there.
How to Hide Pages in WordPress
There are three ways to hide pages in WordPress — hiding the page from the sitemap, setting a page as a draft, and deleting a page completely.
- Hiding the page from the sitemap
- To hide a page from the sitemap, navigate to the back end of the page you want to hide, and scroll to: Yoast SEO > Advanced Settings.
- Selecting the settings No (Index) and No (Follow) will hide pages from the sitemap and search engines.
- Setting a page as a draft
- Go to the page you want to set as a draft and look in the top, right corner for the
- OR go to Pages > All Pages and you’ll see quick edit options on all pages, including whether the page is a draft.
- Deleting a page completely.
- To delete a page completely navigate to Pages > All Pages > Trash.
- You can also delete the page from the back-end of the actual page. It will be in the options panel on the right of the page. Options Panel > Move to Trash.
How to Design Your Content Using Page Blocks
Once your page is set up, you can start building out your page with page blocks.
NOTE: Page blocks are the building blocks for your website. They’ve been designed exclusively for your site, so they resize beautifully on every phone, desktop, and tablet. Sticking to these designs will ensure a great user experience.
How to Add Page Blocks to a Page
Option 1: Plus icon at the top left of the screen > Choose block
Option 2: Hover between two blocks on the page to see a plus > click to open the panel of page blocks.
- Here, you should see some options for choosing page blocks to add to the page.
- You can choose from these 6 most recently used page blocks or select “Browse All” to see all of your page block options.
- Add the page block style that you want. Each page block will have different options based on the style that it is. For visual examples of what each page block looks like, check out your Page Block Library.
- In the settings tab of the chosen page block:
- Edit the settings for that particular page block
- Settings will vary based on the type of page block you have chosen. Typically, the settings here will include background color, column
- options, and layout styling options.
- In the content tab:
- Add in the content accordingly.
- Like the settings tab, the layout of the content tab will vary based on the page block style that you have chosen.
- You can change the order of page blocks with the ∧ and ∨ icons.
NOTE: Each page block style will have a different set of options and content settings.
How to Add/Edit a Reusable Block
To add/edit a new reusable block, go to: Pageblocks > Reusable Blocks > Add New
For certain page blocks, like a footer CTA, you might want to create a reusable block. A reusable block is an individual block that you can add to multiple pages with the same content in all instances.
NOTE: If you update a reusable block in one location, it will update everywhere.
To create a new reusable block:
- Go to: Pageblocks > Reusable Blocks > Add New
- You will be taken to a gutenberg editor where you can add and build out a reusable block, just like you would any other block
- Once you have the content laid out the way you want it, give the block a name
- Publish the block
NOTE: Reusable blocks can be a single page block, or a combination of page blocks.
To add a reusable block to a page:
- Navigate to the page you want the reusable block to live on
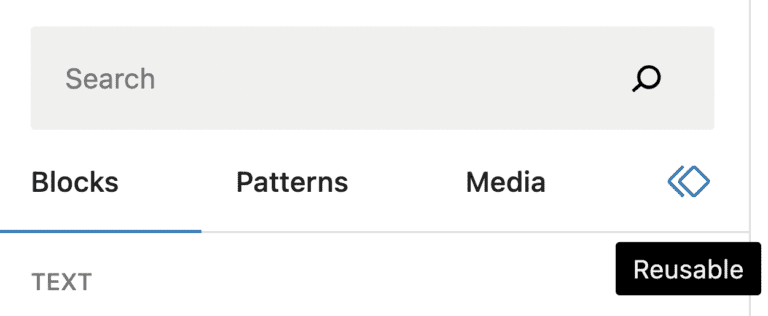
- Click the + icon in the upper-left corner, just like you would to enter a regular block
- Toggle over to the “Reusable” tab.

- Select the block you want to add.
NOTE: You will notice that the reusable block has a bright yellow border around it and a warning message. This is just to remind you that the block is a reusable block and might exist elsewhere on the site.
How to Enter Content in a Content Editor (WYSIWYG)
Entering content into the content editor:
- You can type content directly into the WYSIWYG editor or copy/paste from a word processor.
- If you are copying and pasting content, always use the “Clear Formatting” button after pasting. You can also “paste as plain text.” or use the shortcut on your keyboard to paste as values only. On a mac this is Command+Shift+V
- Use the “Special Characters” button (Ω) to replace any special characters from pasted content. If not, the coding may be different.
Once your copy is in the WYSIWYG, you can continue to style the copy as needed. There are a few tools at your disposal to do this. To see all content styles available on your site, check out your Content Styles page.
- The Paragraph dropdown will let you assign header text to copy in your WYSIWYG.
NOTE: When applying header text to your content, keep accessibility in mind.
WATCH: How to apply accessible header styles - The Formats dropdown contains other styling options including:
- Intro text
- Pre-title text
- Button styles (only applies to links)
- Header styles (only applies to text that already has header text applied from the paragraph dropdown)
NOTE: WYSIWYG stands for “What You See Is What You Get”
How to Clone an Existing Page
Go to the page you want to clone or go to Pages > All Pages > Clone
or
Go to the page you want to clone, click Edit Page > Duplicate Post (in the WordPress dashboard at the top)
- This will create an exact copy of the page that you cloned, including all existing content
- Be sure to update the URL field; typically if a page is cloned, WordPress will append a “-2” to the end of the URL.
NOTE: Make sure to update the H1 as well. Orbit’s best practice recommendation is that no two pages on a site have the same H1 or title.
FAQs about Pages, Page Blocks, & the Gutenberg Editor
Question: Can a page be set to draft after it’s been published?
Yes. You can unpublish a page and save it as a draft at any time.
Question: What if I accidentally deleted a page?
When pages are deleted, they will remain in the trash (Pages > All Pages > Trash) for 30 days.
Question: Why doesn’t my Gutenberg editor show all WordPress sidebar and panel options?
The Gutenberg editor has several different views. To change your view, click on the Options Panel, and you should see the following view options:
- Top toolbar
- Spotlight mode
- Fullscreen mode
- Distraction free
WATCH: How to see WordPress sidebar links and settings by turning off Gutenberg Full Screen Mode
Creating & Editing News & Press
To create a new post, go to: News & Press > Add New
or
Go to: (in the WordPress Toolbar) + New > News & Press
To edit an existing post, go to: News & Press > find the post you’d like to edit > Edit
or
Go to: Find the post you’d like to edit on the front end > Edit News & Press (in the WordPress Toolbar)
How to Set Up a News & Press’s Basic Information
- Enter the name of the post in the “Add title” field.
- The URL will form automatically based on the title that you add.
- If you would like to adjust the URL for this post, open the right hand Settings Panel on the right, and click the URL under “Summary”
NOTE: Avoid changing URLs on existing blog posts unnecessarily to avoid creating broken links throughout the site.
- If you would like to adjust the URL for this post, open the right hand Settings Panel on the right, and click the URL under “Summary”
- Enter your meta data in the Yoast SEO section of your page.
- By default, the SEO title field will populate with the title of the blog post, along with the vertical pipe separator and the site title. If you’d like to replace the title with something optimized for a specific keyword, just remove the “title” and “page” variables and add in the new title.
- The meta description for the blog post can go in the meta description field.
WATCH: How to Write and Add Title Tags & Meta Descriptions to Pages and Posts in WordPress
How to Add and Assign a News & Press’s Categories, Tags, and Featured Images
- Open the Settings Panel.
- Identify the categories you would like to assign the blog post to by checking them in “Categories” section of the Settings Panel.
- If you would like to add a brand new category, you should see an “Add New Category” link below the list of categories.
- Add any relevant tags in the “Tags” section of the Settings Panel.
- If you would like to add a brand new tag, you can do so by simply typing in the name of the new tag into the tag field.
- Set the featured image in the “Featured Image” section of the Settings Panel by clicking on the gray “Set featured image” box. This is the image that will appear on the blog landing page as well as in any blog feed blocks featuring this blog post.
- This will take you to the media library where you can select your featured image or upload a new featured image.
- The recommended dimension sizes for featured images on blog posts can be found in your site’s Style Guide.
How to Enter Content on Your New News & Press Post:
- Below the hero area, insert the page blocks that you would like to use for this blog post. Depending on how your blog is set up, there may already be a Basic Content block in place.
- Because your blog uses the Gutenberg editor, you can use any page blocks from your Page Block Library that you’d like.
- Click “Publish” and you should be able to see your post live on the site.
WATCH: How to troubleshoot content styles in the WYSIWYG editor and paste as plain text
Team Bios
To create a new Team Bio, go to: Team Bios > Add New
or
Go to: (in the WordPress Toolbar) + New > Team Bio
To edit an existing Team Bio, go to: Team Bios > find the bio you’d like to edit > Edit
or
Go to: Find the bio you’d like to edit on the front end > Edit Team Bio (in the WordPress Toolbar)
How to Set Up a Team Bio’s Basic Information
- Enter the name of the bio in the “Add title” field.
- The URL will form automatically based on the title that you add.
- If you would like to adjust the URL for this bio, open the right hand Settings Panel on the right, and click the URL under “Summary”
- The URL structure for this post type will automatically have /team-bio/ appended at the beginning.
NOTE: Avoid changing URLs on existing posts unnecessarily to avoid creating broken links throughout the site.
- Enter your Metadata in the Yoast SEO section of your page.
- By default, the SEO title field will populate with the title of the bio, along with the vertical pipe separator and the site title. If you’d like to replace the title with something optimized for a specific keyword, just remove the “title” and “page” variables and add in the new title.
- The meta description for the bio can go in the meta description field.
WATCH: How to Write and Add Title Tags & Meta Descriptions to Pages and Posts in WordPress
How to Add a Team Bio’s Category and Featured Image
- Open the Settings Panel.
- Identify the category you would like to assign the bio to by checking them in “Team Bios Categories” section of the Settings Panel.
- Set the featured image in the “Featured Image” section of the Settings Panel by clicking on the gray “Set featured image” box. This is the image that will appear on the team bios landing page as well as in any feed blocks featuring this bio.
- This will take you to the media library where you can select your featured image or upload a new featured image.
- The recommended dimension sizes for featured images on team bios can be found in your site’s Style Guide.
How to Enter Content on Your New Team Bio
- When you create a new team bio, you should see a “Team Hero” block already in place. It should have fields for:
- Job Title
- Description/Bio copy
- Because your bio uses the Gutenberg editor, you can use any page blocks from your Page Block Library that you’d like.
- Click “Publish” and you should be able to see your bio live on the site.
WATCH: How to troubleshoot content styles in the WYSIWYG editor and paste as plain text
Resource Center
To create a new Resource Center post, go to: Resource Center > Add New
or
Go to: (in the WordPress Toolbar) + New > Resource Center
To edit an existing Resource Center, go to: Resource Center > find the post you’d like to edit > Edit
or
Go to: Find the post you’d like to edit on the front end > Edit Resource Center (in the WordPress Toolbar)
How to Set Up a Resource’s Basic Information
- Enter the name of the resource in the “Add title” field.
- The URL will form automatically based on the title that you add.
- If you would like to adjust the URL for this resource, open the right hand Settings Panel on the right, and click the URL under “Summary”
- The URL structure for this post type will automatically have /resource-center/ appended at the beginning.
NOTE: Avoid changing URLs on existing posts unnecessarily to avoid creating broken links throughout the site.
- Enter your Metadata in the Yoast SEO section of your page.
- By default, the SEO title field will populate with the title of the resource, along with the vertical pipe separator and the site title. If you’d like to replace the title with something optimized for a specific keyword, just remove the “title” and “page” variables and add in the new title.
- The meta description for the resource can go in the meta description field.
WATCH: How to Write and Add Title Tags & Meta Descriptions to Pages and Posts in WordPress
How to Add a Resource’s Category and Featured Image
- Open the Settings Panel.
- Identify the category you would like to assign the resource to by checking them in “Resource Center Categories” section of the Settings Panel.
- If you would like to add a brand new category, you should see an “Add New Category” link below the list of categories.
- Set the featured image in the “Featured Image” section of the Settings Panel by clicking on the gray “Set featured image” box. This is the image that will appear on the resource center landing page as well as in any feed blocks featuring this resource.
- This will take you to the media library where you can select your featured image or upload a new featured image.
- The recommended dimension sizes for featured images on resource can be found in your site’s Style Guide.
How to Enter Content on Your New Resource
- Below the hero area, insert the page blocks that you would like to use for this resource
- Depending on how your resource is set up, there may already be a Basic Content block in place.
- Because your resource uses the Gutenberg editor, you can use any page blocks from your Page Block Library that you’d like.
- Click “Publish” and you should be able to see your resource live on the site.
WATCH: How to troubleshoot content styles in the WYSIWYG editor and paste as plain text
Menus
WATCH: How to Manage Navigation Menus in the WordPress Gutenberg Theme
To edit menus, go to Appearance > Menus
Go to the “Select a menu to edit:” dropdown, and pick the menu you want to edit. This will take you to the menu editor which you can use to organize, nest, and rearrange how you want your pages to display in your menus.
NOTE: The social media menu in the footer is in a different location. See below.
How to Add Menu Items
- Find the page (or other type of menu item) you want to add to your menu from the “Add Menu Items” selection area on the left.
- Select “Add to Menu,” and the page will appear at the bottom of that menu.
- Drag and drop the page you added to the spot in the menu where you want it to appear.
- To set something as a child menu item, drag the page so it appears indented underneath the primary page.
- Click the arrow on the right side of the menu item for more options. In this area, you can edit the following items:
- Navigation Label (the text that appears in the menu itself)
- Title Attribute
- A checkbox for opening links in a new tab
- (optional) CSS Classes
- Description
- Once you’ve got the menu the way you want it, click the “Save Menu” button in the lower-left corner.
NOTE: If a field you’re expecting to see in WordPress is not visible to you, it might be hidden under Screen Options. Go to “Screen Options” in the upper right corner of your screen, make sure that the field you want to see is selected. Close out of “Screen Options” and the field should now be visible.
How to Update your Mega Menu
To edit the mega menus, go to: Appearance > Menus > filter for Primary Menu
- Lay out all of the page links you will need for the menus first and nest them appropriately. (For more detailed instructions on this, read the “Editing Menus” section above).
NOTE: The layout of pages that you place in this view is going to be the way these pages/links appear in the menus on mobile devices.
- Once the page links are laid out, hover over the parent page of the mega menu you want to edit. You should see a blue “Mega Menu” button appear. Click on that to open the mega menu editor
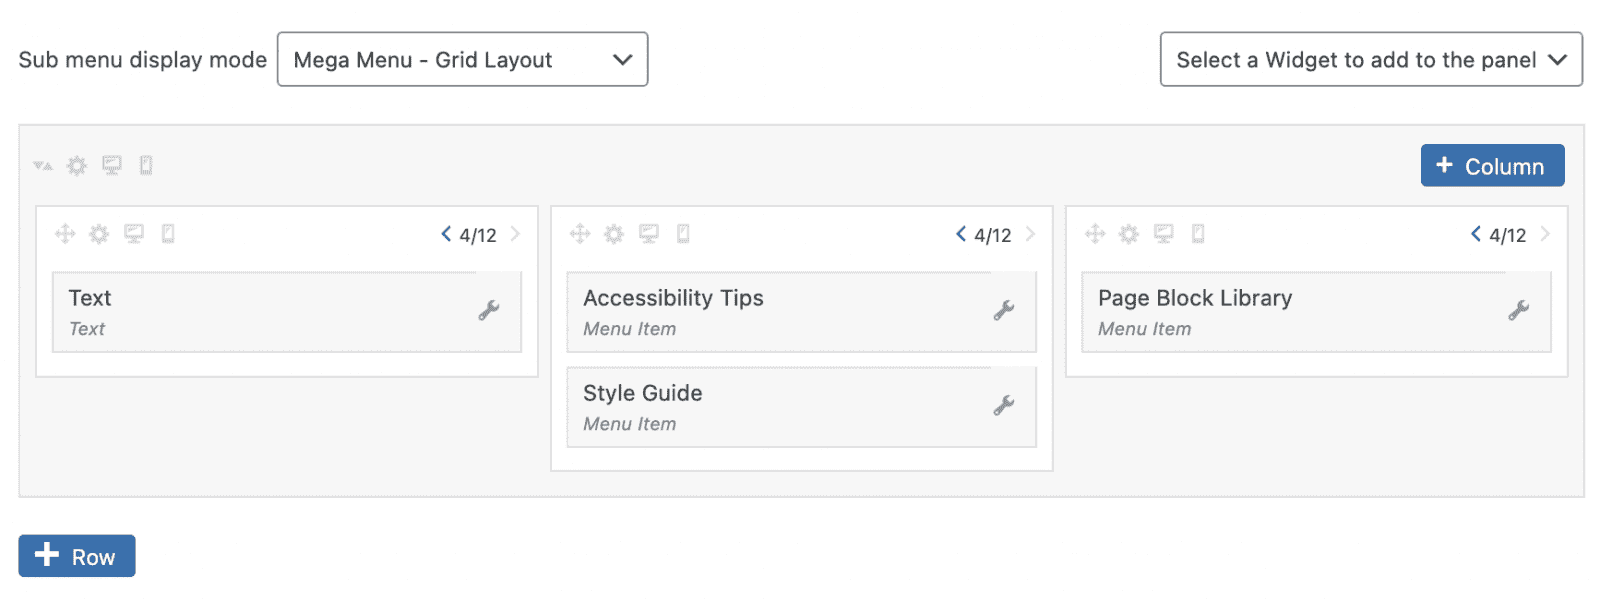
- In the mega menu editor, you should see:
- The column structure of the mega menu on the front end
- Widgets that correspond to the various text areas & child pages within that mega menu.
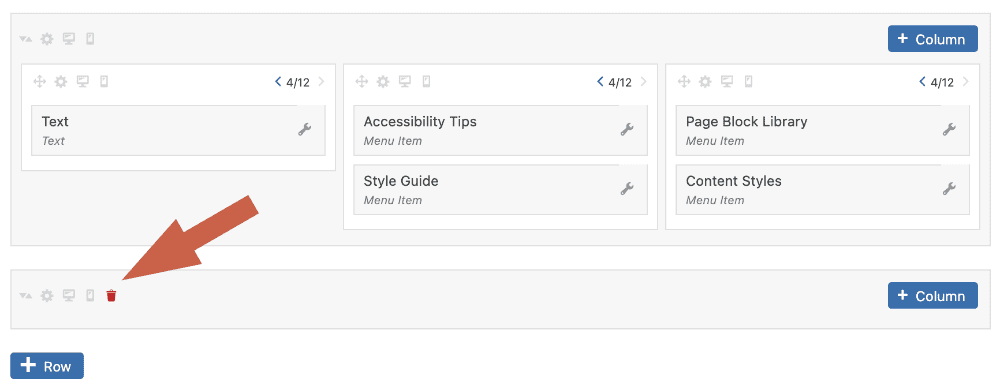
- To adjust the column structure, you should see arrows in the upper right corners of the columns of your mega menu. Using these arrows will allow you to adjust the number of columns (out of 12) that each mega menu column occupies. In the screenshot below, you can see that there are 3 columns, all divided into column widths of 4, which add up to 12.

- To rearrange child pages, simply drag each child page into the appropriate column of the mega menu.
- To edit the “text” widgets within the mega menu, click into the mega menu (blue button mentioned above), expand the widget with the arrow on the right, and edit the text within the WYSIWYG
- To edit the text below each menu item, go to Appearance > Menus. Then, at the top of your screen, in the upper right corner, select the “Screen Options” dropdown. Make sure that “description” is turned on, and then you should be able to expand each individual menu item to add its description.
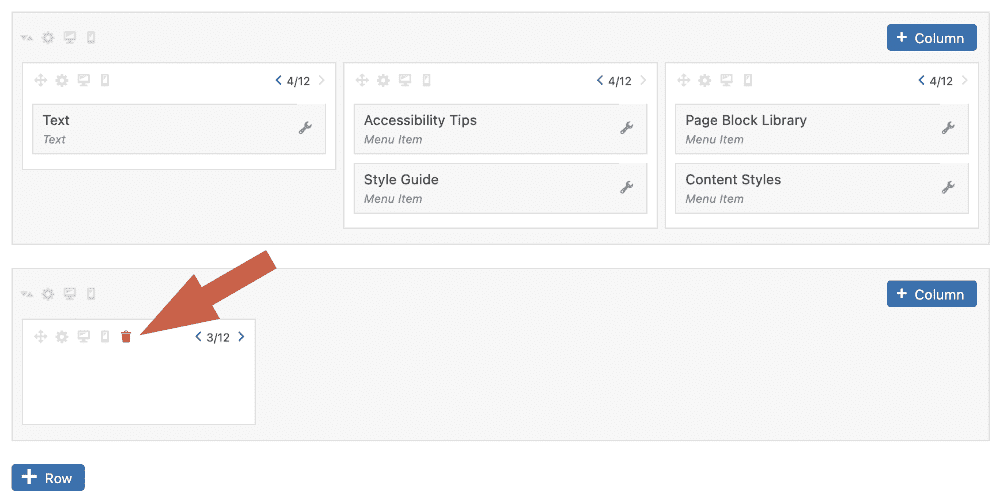
NOTE: If you decide to add a page to a Mega Menu later, you will see it added in a separate bottom row. Drag and drop that page into the desired column and remove the now empty row by hitting the red trash can in the white and gray sections.
How to Update the Social Media Menu
To edit the social media menu, go to: Options > Social Media
- Enter the links in the appropriate fields categorized by application.
- From the icon drop down, select the logo that corresponds to that social media platform.
- Update the page to save changes.
CSS Classes Used on this Site
The menu items on your site use the following CSS classes to change how they are displayed to the user:
- CLASS-NAME is used for ______
- CLASS-NAME is used for ______
FAQs about Menus
Question: What happens to the pages in a menu if I delete a page?
When a page (or any other post type detail page) is deleted, it will disappear from the menus entirely. The next time you navigate to Appearance > Menus, you will see this page in its original spot in the menus, highlighted in red.
Question: What happens to the pages in a menu if I change a page’s URL?
If you update a page’s URL, it will update automatically within the menus to match the new URL. This happens because WordPress’s menus use page ID to add pages to menus instead of just the URL. If a page has been added as a custom link instead of as a page, the URL will be broken in the menu.
Media Library
To view the Media Library, go to: Media > Library
If you need to access the media library while entering content, you can click the “Add Media” within a WYSIWYG text editor or click an “Add Image” button within page blocks that have image fields. These buttons will take you to the Media Library dashboard. On the left-hand side, you will see any folders you have created, and in the center you will see any uploaded images.
NOTE: All images should be cropped and compressed before adding to the media library. It is recommended that images be no larger than 250kb (though sometimes this is unavoidable). You will want to crop the image to the appropriate dimension prior to compressing. This site, tinypng.com, can be helpful in compressing file sizes for images.
WATCH: How to Manage Files in the Media Library & Add Image Alt Text
How to Add Images to the Media Library
- To add new images and files, click the “Add New” button at the top of the page. Then click “Select Files” or simply drag and drop a file into the window.
- You can add files directly to a specific folder or drag and drop them into the proper folder later.
WATCH: How to crop and save an image for web and reduce page load times
How to Create Folders in the Media Library
- Below the “Search Folders” search bar, you should see a parent folder called “Media Library” that includes all images not sorted into folders. Click on that parent folder first.
- Click the “+ Add New Folder” button in the upper left corner.
- Create a title for the new folder and hit “CREATE.”
- You can also nest folders by dragging and dropping them over the folder you wish to nest it under.
- If you wish to create a subfolder, right click on the parent folder and select “New Folder”. Create a title for the folder and hit “CREATE.”
How to Edit the Metadata for a Image or PDF in the Media Library
When you click on an image or PDF, you’ll see a popup preview of the image and its associated metadata:
- Alt text
NOTE: For more information about alt text, check out our accessibility tips page.
- Title
- Caption
- Description
- File URL
NOTE: Orbit’s recommended best practice for image metadata is to add any relevant alt text and leave all other fields blank, unless otherwise required by the design.
How to Change an Image’s File URL
- In some cases, you might have to update an image’s URL in order to free up that slug for another page or file on the site.
- Navigate to the the media library and then find the image whose URL you want to update.
- Click on the image to open the Attachment details panel.
- In the lower right corner, you should see a list of links. Click “Edit more details.”
- In the upper right corner, click on “Screen Options”
- Make sure that “Slug” is selected and then close out of Screen Options
- Scroll to the bottom where you should see the slug field available
- Update the slug as needed (usually in order to free up the slug for another page or file on the site)
- Click “Update”
Alt Text Best Practices
Images used for means other than decoration should have include alt text to describe the image so a screen reader can inform the user of the contents of the image (e.g. Woman using phone at desk). Image alt text should describe the image and should not use special characters.
NOTE: For more information on how to add alt text, read our accessibility tips page.
WATCH: How to Manage Files in the Media Library & Add Image Alt Text
How to Add and Link to a PDF
WATCH: How to Embed a PDF Link into a Page or Post in WordPress
In addition to images, you can also upload and manage PDFs in the Media Library.
Uploading PDFs works the same way as images, the only difference is linking to/adding PDFs to a block.
If you need to link a PDF, the “File URL” field is the link you will use for linking directly to the PDF. Simpy click “Copy URL to clipboard” or manually copy the URL and then use that URL to link to the PDF in a CTA link or button, like you would for a page or external site.
FAQs about the Media Library
Question: Can I crop and edit photos in the media library?
No. You want to crop and edit your photos somewhere outside of WordPress. We don’t recommend cropping or editing photos in WordPress.
Question: Will alt text be on all my images?
Alt text only appears on images where you’ve purposefully placed alt text. See more about Orbit’s alt text best practices on our accessibility tips page.
Question: What file types should I use for my images?
Orbit recommends uploading your images as .jpg/jpeg whenever possible. This is typically the best file type for things like stock photography or background images. For images that need to be higher resolution (like infographics or maps) it’s acceptable to use a png. For icons we recommend a png or an svg.